Sentinel Android Tip Driver ™ Features and Configuration
The following configuration instructions take place using version 3.8.0 of the SentinelBusinessSolutions.TipDriver.DroidDriver.APK {Android Tip Driver} being configured on a Janam XG4 using Android Version 9. All future references to the version of the Android Tip Driver will be referenced as version 3.8.xxxx. Your install of 3.8.xxxx will be very similar if not identical to this one depending upon the version being installed.
This procedure assumes that you have already installed the Android Tip Driver.
- To start the Android Tip Driver you must click on the “SBS Tip Driver” icon.
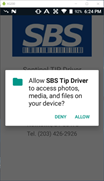
- The first time and only time that you start the Android Tip Driver it will ask you for access permissions. Please respond allow.
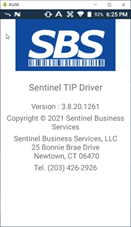
- .You will see the splash screen as the TIP Driver loads and then it will dismiss itself without any user intervention and then land on the Android Tip Driver Main Menu.
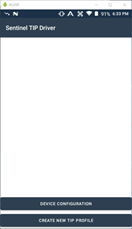
- Before the Android Tip Driver can be used on this device, the “Device Configuration” must be performed. Click on the “Device Configuration” button on the Main Menu and the following screen will be shown;

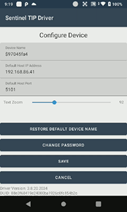
Device Name
The device name is a required entry. A unique default device name will be generated for you. If you choose to not accept this name you must enter a UNIQUE device name.
Default Host IP Address Text Box
This is the hosts (Pathfinder) static IP address that the Android device (client) will use to TCP/IP socket connect to the server that is running the SBS-Pathfinder ™ application.
When you setup a new TIP this will be the default Host IP address shown to you. You may accept it (the default address) or change it to a different IP address for this tip. This might be done in an environment with multiple TIP’s talking to multiple SBS-Pathfinder’s ™.
Default Host Port Text Box
This is the port # that will be used for the TCP/IP communications. It defaults to Port # 5101 which is the same port # that SBS-Pathfinder ™ defaults to. You may accept it (the default port #) or change it to a different port # for this tip. This might be done in an environment with multiple TIP’s talking to multiple SBS-Pathfinder’s ™.
Text Zoom Slider
This value is used to zoom in and out of the size of the text that is displayed in labels, text boxes, buttons etc … We have found that a zoom ratio in the low 90’s simulate the SBS-CASE Tools ™ designer and debugger font.
Restore Default Device Name
If you changed the device name and you decide that you would like to accept the default device name that was originally generated but you don’t remember what it was, then pressing the button will restore the default device name.
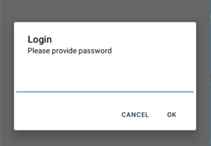
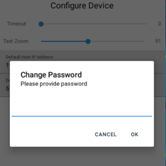
Change Password Button
If the device requires a password to be able to maintain the device configuration or the Tip Profile configuration, then this button will be used to either create or modify a password. When prompted for a password, enter your initial password or change an existing password. Please see the password section of this document for further details on password functionality.
Save Button
Click the “Save” button to update the parameters for the device configuration that you just entered.
Cancel Button
Click the “Cancel” button to NOT update any of the parameters for the device configuration that you just entered.
Data at the bottom of the screen

The data shown is for informational purposes only. It can’t be changed.
- Before the Tip can be used on this device, the “Create New TIP Profile” must be performed. Click on the “Create New TIP Profile” button on the Main Menu and the following screen will be shown;
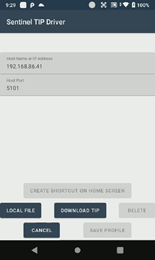
Create Shortcut on Home Screen
This button can only be clicked after a TIP has been setup. Once it is clicked you will see the following screen.
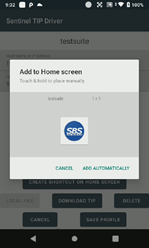
From here you follow the instructions on the screen to either drag the short cut to where you want it or have the system add it to the home screen automatically.
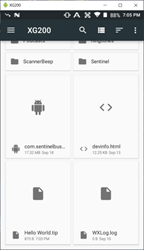
Local File
If the compiled TIP can be found on the Android device then click on the “Local File” and a navigation screen will be shown that will allow you to find and setup that TIP. In this example it is “Hello World”. Select the “Hello World” TIP and you will next be asked to enter the Host IP address and Port # that this TIP will use to communicate with the Pathfinder server. You will notice that it defaults to the IP Address and port # that was entered as parameters into the device configuration section.
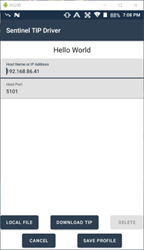
You will either change or accept the default communication configuration parameters. You would then click “Save Profile” to save these changes or “Cancel” to abort the updating of these TIP profile configuration parameters.
Download TIP
If the compiled TIP was imported to Pathfinder then click on the “Download TIP” and a screen will be shown that will allow you to enter the name of the TIP that needs to be setup. In this example it is “Hello World”. Enter the “Hello World” TIP name and you will next be asked to enter the Host IP address and Port # that this TIP will use to communicate with the Pathfinder server. You will notice that it defaults to the IP Address and port # that was entered as parameters into the device configuration section.
Save Profile
Clicking “Save Profile” will save the parameters that were entered for the TIP Profile configuration.
Cancel
Clicking “Cancel” will NOT save the parameters that were entered for the TIP Profile configuration.
Delete
Clicking “Delete” will delete the entire TIP Profile.
- Once a TIP is setup either from a Local File or a Pathfinder download, you will see it show up in the TIP List. You can either configure or start the TIP up by pressing the appropriate button that is associated with the TIP.
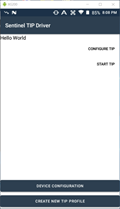
Configure TIP
Clicking “Configure TIP” will ask you to maintain the TIP profile parameters that were previously entered. See “Create New TIP Profile” above for the specific parameters that can be maintained.
Start TIP
Clicking “Start TIP” will start the TIP application.

- If a password was setup then when the “Device Configuration”, “Create New Tip Profile” or the “Configure TIP” buttons are pressed, the operator will be prompted for the password before being allowed into these setup/configuration functions.